
Introduction
OData is a powerful protocol to break up silos that exist in applications when exposing data across different platforms. In many enterprise applications there is a growing demand for multiplatform data sharing support. Another demand is to secure this data, since it is highly probable that this data contains sensitive information only intended for a specific audience.
Different techniques, such as forms authentication or Windows authentication could be used to fulfill this demand. In this walkthrough however, claims based authentication will be used. The reason is that in a web application scenario we would like to provide a user friendly security scheme. This is done by allowing users to use an existing token, instead of registering their Nth username and password. Facebook will be used as the identity provider for the token.
In this blog, the following will be realized:
- Facebook app
- ACS configuration
- OData webservice
- OData consumer (client MVC application)
Prerequisites
The following components are needed in order to complete this walkthrough:
- Visual Studio 2012
- .NET Framework 4.0 and 4.5
- The latest Windows Azure tools (In this walkthrough, June 2012 SP1 v1.7.50716.1601 is used)
- A Windows Azure account
- Windows Identity foundation (For Windows 8 users: you can activate this as a Windows feature in the control pane. Other users can download it here)
- The DPE.OAuth project, which is found in the source code attached to this walkthrough
Steps
This section lists the steps that are needed to realize the desired functionality.
You can find a link to the source code at the bottom of this post.
Overview
-
Management portal
- Create ACS
-
Facebook
- Create app
-
ACS
- Add identity provider
- Create relying party application for the OData service
- Create a rule group for the relying party application
- Create a password based service identity
- Add a rule to the relying party application for the service identity
-
OData service
- Create/Identify data source
- Create WCF Data Service project based on the data source
-
Implement claims based security
- Add DPE.OAuth project
- Modify web.config to include this project
- Authenticate client
-
OData consumer (client)
- Create client application
- Add service reference using anonymous access
- Add querying methods
- Add ACS provider using Visual Studio plugin
- Retrieve a SWT token from the service identity in ACS
- Add the Facebook SAML token information to the SWT token
- Sign the new SWT token
- Send the new SWT token to the OData service for authentication
The amount of steps indicate that enabling claims based authentication is no trivial task. These steps will be explained one by one in order for them to be reproducible.
Management portal
The management portal of Windows Azure is needed in order to support claims based authentication. The management portal can be found on http://windows.azure.com
Create ACS
In order to configure identity providers, claims, rules and so on, we need to create a new service namespace as follows:
On the management portal, click on “Service Bus, Access Control & Caching”.

Service Bus, Access Control & Caching.

New service namespace.
Click on “New”.
Check “Access Control”, choose a namespace and a region and click on “Create
Namespace”.

Create a new Service Namespace.
Click on “Access Control Service”

Access Control Service.
The ACS opens. Leave this screen open. We will need to configure this in the ACS section.
In order to authenticate via Facebook, a Facebook application has to be created.
In a new window, navigate to http://www.facebook.com/developers.
Click on “Create New App”.
Create new Facebook App.

Create New Facebook App details.
Give it a name and click on “Continue”.

Specifying the ACS.
Click on Website with Facebook Login, specify the address of the ACS and click on “Save Changes”.
Notice on the top the App ID and the App Secret. These two values are needed later in the ACS section, so be sure to keep them close at hand for the moment.
ACS
Now that a Facebook App has been created, go back to the window in which the Access Control Service was loaded.
Add identity provider
Click on “Identity providers” and click on “Add”.

Create Identity Provider.
Click “Facebook Application” and click on “Next”.

Adding the Identity Provider.
Specify the Application ID and secret, which were listed in Facebook and click on “Save”.

Adding the Identity Provider.
Create OData service relying party application
Click on “Relying party applications” and next, click on “Add”.

Adding a relying party application.
Give the relying party application a name, enter http://127.0.0.1 for the Realm, set the token format to SWT, check the Facebook-1 (in this example) as the Identity provider, click on “Generate” to create a token signing key, leave all other settings on their default value and click on “Save”.

Relying party name and realm.

Relying party token format.

Relying party Identity providers.

Generate token signing key.
Note: The client should also have knowledge about this key, since we follow the principles of the symmetric-key algorithm. Later we will see where this value can be stored in the client.
Create relying party application rule group
Now that a rule group has been created by default for the relying party, we will need to configure it.
Click on “Rule groups” and next on the rule group for the name that you have defined in the previous step.

Generating rules.
Click on “Generate”.

Generate rules.
Again, click on “Generate”.

Generate rules.
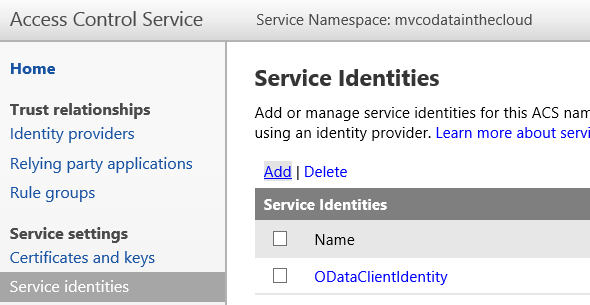
Create password based service identity
Click on “Service identities” and next on “Add”.
Add a service identity.
Specify a name for the service identity, set its type to “Password”, specify a password and click on “Save”.

Service identity properties.
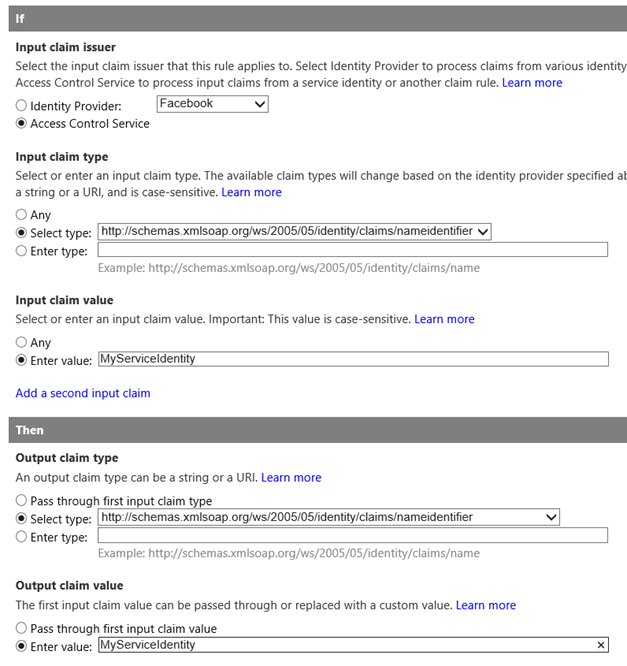
Add service identity rule to relying party application
Go back to “Rule groups” and click on the default rule group of the relying application that was added before.

Adding a service identity rule.
Click on “Add”.

Adding a service identity rule.
Specify “Access Control Service” as the input claims issuer. Next, specify nameidentifier as the input claim type. Enter the name of the service identity (in this example: MyServiceIdentity) as the input claim value. Finally, specify the same values for the output claim type and output claim value.
Generate pass through rule for service identity.
This concludes the ACS configuration.
OData service
After having made the necessary configurations in ACS, we will proceed in creating the OData service.
Create/Identify data source
For this walkthrough, we have created a SQL Azure database based on the AdventureWorks data. This can be downloaded on http://msftdbprodsamples.codeplex.com/releases/view/37304
Create WCF Data Service project

Create a Windows Azure project.
Start Visual Studio in Admin mode and create a new Windows Azure Cloud Service project (make sure .NET Framework 4.0 is selected).
In the next screen, click on “WCF Service Web Role” and click on the arrow pointing to the right. Rename the web role if desired and click on “OK”.

Selecting the service web role.

Add data model.
Right click on the project and add a new item, select “ADO.NET Entity Data Model”, give the model a name and click on “Add”.

Creating a new SQL Azure connection.
Click “Generate from database” and click on “Next”.
Click on “New Connection…”.
After having installed the AdventureWorks database, the connection settings can be found on https://manage.windowsazure.com, under “SQL DATABASES”. You can then click on the name of your database and on the right you will see “Show connection strings”.

Show connection string in the Azure management portal.
Fill in the Server name and credentials (note: always use SQL Server Authentication in SQL Azure), select the database name and click on “OK”.

SQL Azure connection string.

Select table to expose.
For this demo, it will suffice to include sensitive data into the web.config file, so click on “Yes, …” and specify a name for the entities (in this example “PersonEntities”).
Click on “Next”.
From all tables, only select the Person table, specify a name for the model (in this example PersonModel) and click “Finish”.
Now Visual Studio attempts to connect to the SQL Azure database and shows the entity framework diagram.
Add the System.Data.Services reference to the web role project.
Data service reference.

Add data service item.
Add a new WCF Data Service item to the web role project.
Change the class name and make it inherit from DataService<PersonEntities>
Replace the code as follows:
public class PersonODataService : DataService<PersonEntities>
    {
        // This method is called only once to initialize service-wide policies.
        public static void InitializeService(DataServiceConfiguration config)
        {
            config.SetEntitySetAccessRule("*", EntitySetRights.AllRead);
            config.SetEntitySetPageSize("*", 10);
            config.DataServiceBehavior.MaxProtocolVersion = DataServiceProtocolVersion.V2;
            config.UseVerboseErrors = true;

        }

        protected override void OnStartProcessingRequest(ProcessRequestArgs args)
        {
            base.OnStartProcessingRequest(args);
        }
    }
Remove the System.Data.Services.Client reference and press F5. The solution will build and you will see a page with the OData entries in XML format.
Implement claims based security
Add the DPE.OAuth project to the solution.

Adding the OAuth project.

Projects in solution.
Add the Microsoft.IdentityModel (located in the GAC, version 3.5) reference to the web role.
Open the web.config of the web role and add the following line after the <configSections> tag.
<section type="Microsoft.IdentityModel.Configuration.MicrosoftIdentityModelSection, Microsoft.IdentityModel, Version=3.5.0.0, Culture=neutral, PublicKeyToken=31bf3856ad364e35" name="microsoft.identityModel"></section>
Replace the <modules> tag by the following:
<modules>
      <add name="ProtectedResourceModule" type="Microsoft.Samples.DPE.OAuth.ProtectedResource.ProtectedResourceModule" />
      <add name="WSFederationAuthenticationModule" type="Microsoft.IdentityModel.Web.WSFederationAuthenticationModule, Microsoft.IdentityModel, Version=3.5.0.0, Culture=neutral, PublicKeyToken=31bf3856ad364e35" preCondition="managedHandler" />
      <add name="SessionAuthenticationModule" type="Microsoft.IdentityModel.Web.SessionAuthenticationModule, Microsoft.IdentityModel, Version=3.5.0.0, Culture=neutral, PublicKeyToken=31bf3856ad364e35" preCondition="managedHandler" />
    </modules>
Remove the <directoryBrowse> tag.
Insert the following after the </entityFramework> tag:
<microsoft.identityModel>
    <service name="OAuth">
      <audienceUris>
        <add value="http://127.0.0.1/" />
      </audienceUris>
      <securityTokenHandlers>
        <add type="Microsoft.Samples.DPE.OAuth.Tokens.SimpleWebTokenHandler, Microsoft.Samples.DPE.OAuth" />
      </securityTokenHandlers>
      <issuerTokenResolver type="Microsoft.Samples.DPE.OAuth.ProtectedResource.ConfigurationBasedIssuerTokenResolver, Microsoft.Samples.DPE.OAuth">
        <serviceKeys>
          <add serviceName="http://127.0.0.1/" serviceKey="[Your symmetric key from ACS here]" />
        </serviceKeys>
      </issuerTokenResolver>
      <issuerNameRegistry type="Microsoft.Samples.DPE.OAuth.ProtectedResource.SimpleWebTokenTrustedIssuersRegistry, Microsoft.Samples.DPE.OAuth">
        <trustedIssuers>
          <add issuerIdentifier="https://[Your ACS namespace here].accesscontrol.windows.net/" name="[Your relying party service name here]" />
        </trustedIssuers>
      </issuerNameRegistry>
    </service>
  </microsoft.identityModel>
Notice the symmetric key, ACS namespace and relying party service name. These have been identified in earlier steps. In this example, the ACS name space is mvcodatainthecloud and the relying party service name is MvcOdataInTheCloud.org. Of course I will not share the symmetric key here, but I’m certain that you will find it if you covered the earlier steps. Furthermore, we use localhost here (127.0.0.1), since we would like to debug it and see how the token moves from the client to the service. In ACS we have also specified that the relying OData service application runs on 127.0.0.1.
Add a reference to the DPE.OAuth project.

Add reference to DPE.OAuth project.
If you press F5 now and navigate to http://127.0.0.1/PersonODataService.svc, you will still see the data in XML format, because no authentication checks have been written yet in the service code.
Replace the existing code in the svc.cs file with the following code:
protected override void OnStartProcessingRequest(ProcessRequestArgs args)
        {
            ThrowIfNotAuthenticated();
            base.OnStartProcessingRequest(args);
        }

        private static void ThrowIfNotAuthenticated()
        {
            var identity = HttpContext.Current.User.Identity;
            if (identity == null || !identity.IsAuthenticated)
            {
                OAuthHelper.SendUnauthorizedResponse(new OAuthError { Error = OAuthErrorCodes.UnauthorizedClient }, HttpContext.Current);
            }
        }
Add the following using statement:
using Microsoft.Samples.DPE.OAuth;
If you again press F5, you will get an unauthorized response, because there is no token to be validated.
OData consumer (client)
Now that we have set up the service, we will proceed and create a client application.
Create client application
Open a new instance of Visual Studio in administrator mode, create a new MVC3 application (make sure the .NET Framework 4.5 version is selected). The reason that I used MVC3, is that I was experiencing some issues with MVC4.
Click on “OK”.

Create MVC 3 Web Application.
Click “OK” in the next screen, having selected “Internet Application”.
Add service reference using anonymous access
We need to add the OData service reference, but since the OData service has been secured, it cannot be added simply in Visual Studio. Luckily we are in control of the OData service, so we could expose it for a moment, add a service reference and switch on the security again. I understand that in a real world scenario this is not possible. In that case it should be wise for the OData authority to provide clients with the necessary updates using for example DataSvcUtil.exe.
In the OData service, put the “ThrowIfNotAuthenticated()” call within comments in the OnStartProcessingRequest method of the svc.cs class.
Press F5 in the OData service project, so that the service is running.
In the client solution, right click on the MVC3 project and click “Add Service Reference”. Type in the address and click on “Go”. Choose a name for the service reference and click on “OK”.

Adding a service reference.
Now stop the OData service and include the “ThrowIfNotAuthenticated()” call, so that the OData service is secured again.
Add querying methods
In the client solution, add a new class to the Models directory called “PersonRepository”, which should contain the following code:
public class PersonRepository
    {
        private Uri _awEntitesUri = new Uri("http://127.0.0.1/PersonODataService.svc");
        private PersonEntities persons;
        public PersonRepository()
        {
            SetContext();
        }

        public List GetPersons(int skip, int take)
        {
            var query = from c in persons.Person orderby c.LastName + c.FirstName select c;
            return query.Skip(skip).Take(take).ToList();
        }

        public List GetPersonByFirstName(string firstName)
        {
            var query = from c in persons.Person
                        where c.FirstName == firstName
                        orderby c.LastName + c.FirstName
                        select c;

            return query.ToList();
        }

        private void SetContext()
        {
            persons = new PersonEntities(_awEntitesUri);

            //Retrieve SWT token from Service Identity
            string token = AuthenticationHelper.GetTokenFromAcs("http://127.0.0.1/");
            //Add SAML claims from FaceBook to SWT token.
            token = AuthenticationHelper.AddClaimsToToken(Thread.CurrentPrincipal.Identity as ClaimsIdentity, token);
            //Add signing key signature to token.
            token = AuthenticationHelper.AddTokenSignature(token);

            persons.SendingRequest += (sender, args) => args.RequestHeaders.Add("Authorization", "OAuth " + token);
        }
    }
Add the following using statements:
using MVCODataOAuthClient.PersonODataService;
using System.Security.Claims;
using System.Threading;
The solution will not build, because the AuthenticationHelper class is not defined. We will come back to this later. For now, save the project.
Add ACS provider using Visual Studio
Right click on the project, and click on “Identity and Access”. In versions prior to Visual Studio 2012, this has been offered as an add-in.
Select “Use the Windows Azure Access Control Service” and click on “Configure”.

Configuring Identity and Access.

ACS namespace.
The namespace is the one displayed in ACS:
Service namespace.
The management key can be found in the ACS portal, when you click on “Management service” -> the management service account -> symmetric key.
Click on the Facebook identity provider defined earlier and click on “OK”.

Selecting the identity provider.
Visual Studio has changed the web.config file of the client and added the necessary configuration to ACS.
Retrieve a SWT token from ACS and add SAML information to the SWT token
Add a new class named AuthenticationHelper to the project, with the following code (replace the wrapPassword with the password you specified in ACS):
public static class AuthenticationHelper
    {
        #region Public Methods

        public static string GetTokenFromAcs(string scope)
        {
            const string wrapPassword = "[Your service identity password]";
            const string wrapUsername = "[Your service identity name here]";

            // request a token from ACS
            var client = new WebClient();
            var address = new Uri("https://[your service namespace here].accesscontrol.windows.net/WRAPv0.9/");

            var values = new NameValueCollection();

            values.Add("wrap_name", wrapUsername);
            values.Add("wrap_password", wrapPassword);
            values.Add("wrap_scope", scope);

            byte[] responseBytes = client.UploadValues(address, "POST", values);

            string response = Encoding.UTF8.GetString(responseBytes);

            string token = response.Split('&').Single(value => value.StartsWith("wrap_access_token=", StringComparison.OrdinalIgnoreCase)).Split('=')[1];

            return token;
        }

        public static string AddClaimsToToken(ClaimsIdentity claimsIdentity, string token)
        {
            var claims = new List();
            foreach (Claim claim in claimsIdentity.Claims)
            {
                claims.Add(claim.Type + "=" + claim.Value);
            }

            int indexOfAudience = token.IndexOf(HttpUtility.UrlEncode("&Audience"), StringComparison.Ordinal);
            string joinedByAmpersandClaims = HttpUtility.UrlEncode(string.Join("&", claims));
            string tokenWithAddedClaims = token.Insert(indexOfAudience, "&" + joinedByAmpersandClaims);

            return tokenWithAddedClaims;
        }

public static string AddTokenSignature(string token)
        {
            string unsignedToken = GetUnsignedToken(HttpUtility.UrlDecode(HttpUtility.UrlDecode(token)));
            var hmac = new HMACSHA256(Convert.FromBase64String("[Your symmetric key here]"));

            byte[] locallyGeneratedSignatureInBytes = hmac.ComputeHash(Encoding.ASCII.GetBytes(unsignedToken));

            string locallyGeneratedSignature = Convert.ToBase64String(locallyGeneratedSignatureInBytes);

            token = unsignedToken + "&HMACSHA256=" + HttpUtility.UrlEncode(locallyGeneratedSignature);

            return token;
        }

        #endregion Public Methods

        #region Private Methods

        private static string GetUnsignedToken(string swtSigned)
        {
            // Assume signature is at the end of token
            var signaturePosition = swtSigned.IndexOf(string.Format("&{0}=", "HMACSHA256"), System.StringComparison.Ordinal);
            if (signaturePosition <= 0)
            {
                return null;
            }

            var unsigned = swtSigned.Substring(0, signaturePosition);

            return unsigned;
        }

        #endregion Private Methods
    }
Add the following using statements:
using System.Net;
using System.Security.Claims;
using System.Security.Cryptography;
using System.Text;
using System.Collections.Specialized;
Add the following using statement to the PersonRepository.cs file:
using MVCODataOAuthClient.Helpers;
The solution will now build successfully.
Finally, we will need a page that calls the defined queries in the PersonRepository.
We add a PersonsController as follows:

Adding a controller.

Adding a controller.
Next, we replace the Index() method by the following code:
public ActionResult Index(int? page)
        {
            var repository = new PersonRepository();
            if (page == null || page < 0)

                page = 0;

            ViewBag.AllPersonsInvokedByOdataClientLibrary = repository.GetPersons(page.Value * 10, 10);
            ViewBag.SpecificPersonInvokedByOdataClientLibrary = repository.GetPersonByFirstName("Ken");
            return View();
        }
Add the following using statement to the class:
using MVCODataOAuthClient.Models;
You will notice that it will not compiled, because we have not defined a view for the persons yet.
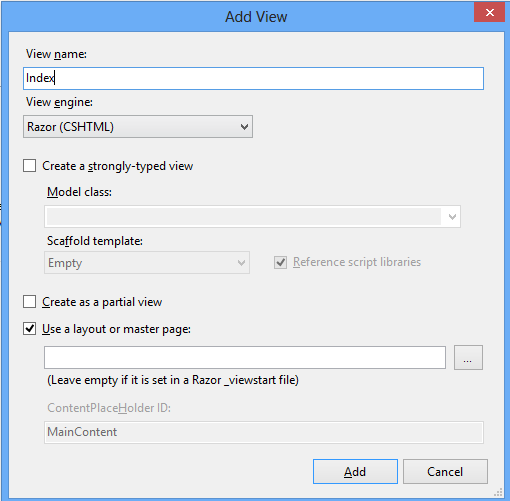
Add a new folder called “Persons” as a subfolder of the “Views” folder. Next, add a view called “Index” to the “Persons” folder.

Adding a view.
Adding a view.
Replace the code in the Index.cshtml by the following:
@model IEnumerable<MVCODataOAuthClient.PersonODataService.Person>
@{
    ViewBag.Title = "Index";
}</pre>
<h2>Index All Persons</h2>
<table>
<tbody>
<tr>
<th>FirstName</th>
<th>MiddleName</th>
<th>LastName</th>
</tr>
@foreach (MVCODataOAuthClient.PersonODataService.Person item in ViewBag.AllPersonsInvokedByOdataClientLibrary) {
<tr>
<td>@item.FirstName</td>
<td>@item.MiddleName</td>
<td>@item.LastName</td>
<td></td>
</tr>
}</tbody>
</table>
<h2>Index Specific Person</h2>
<table>
<tbody>
<tr>
<th>FirstName</th>
<th>MiddleName</th>
<th>LastName</th>
</tr>
@foreach (MVCODataOAuthClient.PersonODataService.Person item in ViewBag.SpecificPersonInvokedByOdataClientLibrary) {
<tr>
<td>@item.FirstName</td>
<td>@item.MiddleName</td>
<td>@item.LastName</td>
<td></td>
</tr>
}</tbody>
</table>
<pre>
Build and run the project. After having logged on as a Facebook user, navigate to /persons to see a list of persons. You have been authenticated by using your Facebook claim.
Source code
Conclusion
As can be seen, realizing claims based authentication for a REST based service in Windows Azure requires a fair amount of steps. Luckily thanks to ACS support for Facebook, the OAuth protocol and the DPE.OAuth project there is less development effort needed to realize claims based security. To further reduce development effort, it would be good to have out of the box support for SWT tokens in WIF (without using an extension like the DPE.OAuth project), but currently there are no signs to support this in the future.
All in all, I believe that the possibility to apply claims based authentication on OData services is a really powerful feature. The strength of OData to share data on different platforms and the strength of claims based security to allow users to logon using tokens from existing Identity Providers combines a flexible yet secured application. This will definitely be useful in enterprise scenarios, which need to support secured data applications in a web context on different platforms.
